
Setting default values for parameters on document templates will effectively build in a permanent filter to the template for when it is run in-app.
- How to Edit a Parameter
- Insights Template Parameters Required In-app
- Insights Template Configuration Parameters
How to Edit a Parameter
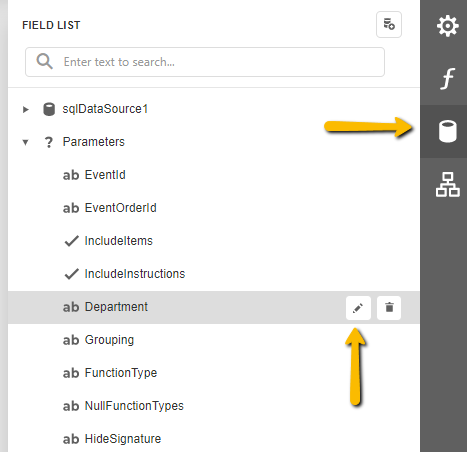
- Click the Field List icon.
- Expand the Parameters at the bottom of the list.
- Select the parameter you want to modify.
- Click the pencil icon (once in the parameter settings, you can select other parameters and modify them without going back to the field list)
- The Edit Parameters window will open.
- The list of existing parameters is on the left.
- The Value field represents the default setting that needs to be changed and saved to modify the template behavior.
- The following parameters are set automatically when running the template in VenueOps:
- EventId (listed in the URL)
- EventOrderId (*last set of digits on any previously generated event order)
- InvoiceId (*last set of digits on any previously generated invoice)
- ContactId (listed in the URL)
- PaymentId (listed in the URL)
- CreditId (*last set of digits on any previously generated invoice)
- ExhibitorOrderId (*last set of digits on any previously generated exhibitor service order)
- ExhibitorInvoiceId (*last set of digits on any previously generated exhibitor invoice)
- These don’t affect the behavior of the template.
- If you change the default parameter value in the Insights designer, it will be overwritten when you run the template in-app.
- 🚩*Insert video links - how to find these id #'s in app🚩
- Invoices
- Event Orders
- Contracts
Insights Template Parameters required in-app
Insights Template Configuration Parameters
Most standard template types don't have configurable parameters, but they do exist for these template types:
The following parameters can be configured in the Insights designer based on the needs of the venue:
- Select Yes in the parameter configuration to show the inventory items.
- Select No in the parameter configuration to hide the inventory items.
- Select Yes in the parameter configuration to show the inventory instructions.
- Select No in the parameter configuration to hide the inventory instructions.
- The template has the ability to filter on Function Type. Function Type isn't a required field, so Null values exist when there is no Function Type assigned.
- Select Yes in the parameter configuration to show functions that have no function type set.
- Select No in the parameter configuration to hide functions that have no function type set.
- Select Yes in the parameter configuration to hide the signature section.
- Select No in the parameter configuration to show the signature section.
- You must use the preview to determine the department id # (here is how to do that?)
- In the designer, click Preview.
- Under Preview Parameters, click to open the Department(s) dropdown.
- The department id is listed inside the parentheses.
- Example: department-2
- Write down the department id’s exactly as listed to input on the parameter configuration page.
- To set the Default Values for specific departments, edit the Departments parameter.
- Un-check Select All Values
- Click the + icon (once for each department that needs to be included).
- Type the department IDs as found in the Departments dropdown in the report preview. Capitalization matters.
- The department id is listed inside the parentheses.
- You must use the preview to determine the Function Type name.
- In the designer, click Preview.
- Under Preview Parameters, click to open the Include Function Type(s) dropdown.
- Write down the function types exactly as listed to input on the parameter configuration page.
- To set the Default Values for specific function types, edit the FunctionType parameter.
- Un-Select the ‘Select All Values’ selection as seen in the screenshot below.
- Click the + icon (once for each function type that needs to be included).
- Type the Function Type as found in the 'Include Functions Type(s): parameter dropdown in the report preview. Capitalization matters. These will not be IDs, just the names.
- This parameter setting will tell the report how to set the 1st, 2nd and 3rd levels of grouping for the Department Requirements section.
- You must use the preview to determine the Grouping name.
- In the designer, click Preview.
- Under Preview Parameters, click to open the Include Grouping dropdown.
- Write down the Grouping exactly as listed to input on the parameter configuration page.
- To set the Default Values for specific function types, edit the Grouping parameter.
- Type the Grouping Name from the Grouping parameter dropdown in the report preview. Capitalization matters. You can ONLY SELECT ONE.
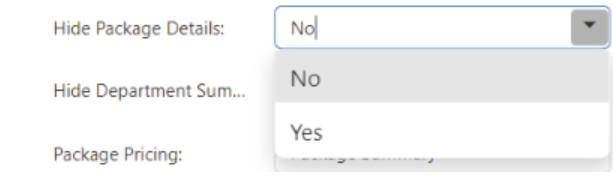
- This parameter setting will tell the report whether individual package components should be displayed or just the Package name and price.
- To set the Default Value, edit the PackageDetails parameter.
- Select No in the parameter configuration to show the package header and every component of the package.
- Select Yes in the parameter configuration to hide the package components and only display a row with the Package Name and package total.
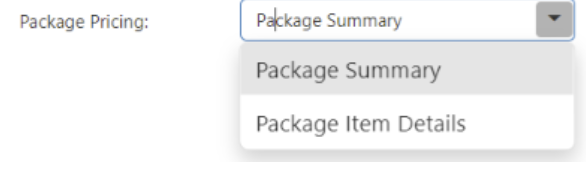
- This parameter setting will tell the report whether to display individual package components' pricing or only the pricing for the entire package.
- To set the Default Value, edit the PackagePricing parameter.
- Select Package Summary in the parameter configuration to show only pricing for the entire package and no pricing for each component.
- Select Package Item Details in the parameter configuration to show the pricing for each component of a package and then show a summary total.
-
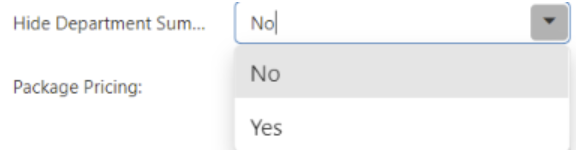
- This parameter setting will tell the report to hide or display the summary section before the financial calculations near the end of the report. The section gives a summary of 1 row per department with financials.

- To set the Default Value, edit the PackageDetails parameter.
- Select No in the parameter configuration to show the financial summary section in the report.
- Select Yes in the parameter configuration to hide the financial summary section in the report.
Comments
0 comments
Article is closed for comments.